Search This Blog

Tuesday, August 11, 2015

Two Heads Are Better Than One...

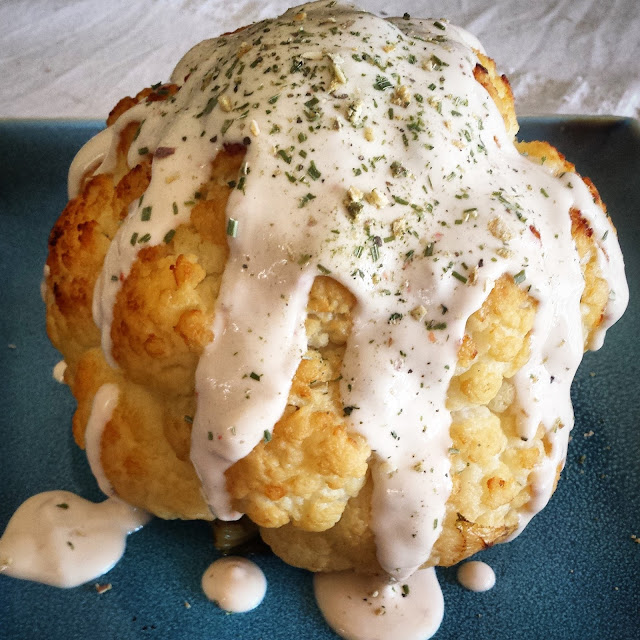
Admittedly, I am a sometimes vegetarian and all of the time talk radio addict. One day while driving to work listening to my favorite Los Angeles talk radio station I heard the hosts raving about an amazing dish that they order regularly at Stonefire Grill in LA.  I was in one of my I'm never eating meat again phases and they were talking about the roasted cauliflower with tahini that they had eaten the previous day, it sounded amazing! After work I headed straight to the store to pick up my head of cauliflower and went home and started my research. This is the recipe that I cobbled together and I think its pretty fabulous. I had it as a main course, but, it would make a great starter or side dish. I hope you enjoy it as much as I did!

Roasted Cauliflower with Lemon Tahini


Ingredients:
  • 1 large head cauliflower
  • 3 tsp. olive oil, divided
  • 2 cloves garlic, crushed and minced.
  • 6 Tbs. tahini
  • 2 Tbs. lemon juice
  • 1 tsp. crushed red pepper
  • 1/2 tsp. salt
  • 1 Tbs. chopped parsley
  • 1 tsp. toasted sesame seeds 


Directions:

  • Prepare your cauliflower by cutting off the base so entire head will sit flat on your cookie sheet in the oven.
  • Place entire head of cauliflower in a large stock pot of boiling water. Let boil for about 5 to 7 minutes until base becomes tender.
  •  Preheat oven to 425°F.
  • Drizzle cauliflower with 3 tsp. olive oil, and season with salt and place on large cookie sheet, and bake 15 to 20 minutes, or until cauliflower is fork-tender and golden brown. 
  • Heat the remaining 2 tsp. olive oil in small saucepan over medium heat. Sauté garlic in oil 2 to 3 minutes. Remove from heat 
  • In a small bowl place tahini, lemon juice, red pepper, 10 Tbs. water, and salt. Stirring very well. If needed add water to reach desired consistency.
  • Add sauted garlic to your Tahini mixture and continue to stir until well blended.
  • Place Cauliflour on serving plate and drizzle with Tahini sauce, top with toasted sesame seeds and parsley. 
  • To serve cut into quarters and enjoy!

Thursday, April 16, 2015

Tea for Two or More for Me...

Mad Hatter: Would you like a little more tea?
Alice: Well, I haven't had any yet, so I can't very well take more.
March Hare: Ah, you mean you can't very well take less.
Mad Hatter: Yes. You can always take more than nothing.
Alice in Wonderland. Walt Disney, 1951
I am in love with Tea. I love the ritual of making tea, I love the feeling I get sipping tea in my jammies with a book on a cool night or getting dressed up for tea with my friends. I like High Tea and boots and jeans at 6 am tea.  I like trying new teas, but, am partial to plain old English or Irish breakfast tea. I used to take my tea with milk and that was it. However, after a trip to Egypt I began to take my tea with sugar as all of my Egyptian friends take theirs. Since that particular trip, I have embraced a little sweetness in my tea (hot tea only, iced tea still has to be unsweetened in my book). One of my morning rituals is to make a tea latte, think coffee latte but with tea. I love the creamy foam on the top and the rush of warm sweet brewed tea underneath. Of course, tea is better with scones and jam and the good news is that scones are incredibly easy to make and make your tea experience complete. Today, I am sharing with you three simple recipes to make your own personal tea time just right.  Oh and just in case it's your un-birthday, a very merry un-birthday to you!

Honey Vanilla Tea Latte

Ingredients:
6-oz double-strength tea ( I use 2 bags of English Breakfast)
1/4 tsp vanilla extract
3 tbsp honey (2 for the tea and 1 to drizzle)
4-oz milk, Steamed and Frothed.

Directions:
  • In a large glass or tea cup, combine tea, vanilla and honey
  • Stir well. 
  • Add in steamed milk and top with frothed milk.
  • Drizzle with honey to finish.

Traditional English Scones

Ingredients:
3 Cups of Flour
1/2 cup white sugar
5 tsp baking powder
1 tbs Vanilla Extract
1/2 tsp salt
3/4 cup of butter, room temperature.
1 egg
1 cup milk

Directions:
  • Preheat oven to 400 degrees. Lightly grease a baking sheet or use a silicone liner.
  • In a large bowl, combine all dry ingredients ( flour, sugar, baking powder, and salt). Cut in butter, using a fork or your fingers. The mix should look crumbly when you're done.  Add the egg and milk  into flour mixture and stir until moistened.
  • Turn dough out onto a lightly floured surface, and knead very briefly. 
  • Using your hand or a spoon, place 8 small mounds of the dough on your baking sheet.
  • Bake 15 minutes in the preheated oven, or until golden brown.


Quick and Easy Strawberry Jam

Ingredients:

16 oz strawberries,hulled and quartered
3/4 cup of sugar
2 tbs lemon juice

Directions:
  • In a medium sauce pan, mix strawberries, sugar, and lemon juice.
  • Consistently stir over medium heat until the sugar is dissolved.
  • Increase your heat to med-high and bring mixture to a boil, stirring frequently. Allow your jam to boil for about 10-15 minutes. Your strawberries should be breaking down, but there should still be some with some form to give your jam texture. 
  • Transfer your jam to a clean jar or container and allow to cool. Seal container and store in your refrigerator up to 10 days or freeze.

Wednesday, April 15, 2015

A Berry Good Dessert...


Have I told you how much I love my family? Well, if you were unaware I love them beyond distraction. Our family is loud, full of energy and passionate about life and I like it like that. When my niece Riley was little, she too was a bundle of endless energy. When I would come to visit we would make cupcakes together. We started cooking together when Riley was about 3 and those memories are some of my favorites. My perfect little strawberry blond niece would get so excited when I would let her crack the eggs, pour the milk and run the stand mixer. Riley continues to be a kitchen superstar and helps her Mom cook on a regular basis. This recipe was made by Andrea and Riley. Riley said that is was "amazing", "yummy", "fun" and "awesome".  That is a pretty good endorsement! 


Riley working her kitchen magic on the whipped cream.


Riley's Berry Delicious Strawberry Mousse


Ingredients:

  • 1 pint fresh strawberries, rinsed, hulled, and cut in quartered.
  • 1 large package or 2 small packages sugar-free strawberry flavored gelatin or Jello
  • ¼ cup white sugar
  • 1 ½ cups heavy whipping cream, whipped just beyond soft peaks
  • whipped topping, for garnish (we used strawberry cool whip)
  • whole fresh strawberries, for garnish
Directions:
  • In a large bowl, use a fork or potato masher to crush the strawberries. Drain the juice into a bowl and set aside.
  •  Add enough water to the reserved strawberry juice to make 1 ½ cups liquid in total.
  •  Place the strawberry juice and water mixture on the stove top in a medium saucepan. Bring the liquid to a boil and remove from the heat. 
  • Add your strawberry flavored gelatin or jello to your sauce pan. Stir until gelatin is completely dissolved. Cool your mixture in the refrigerator about 5 to 10 minutes. Do not allow it to jell. When gelatin mixture is cool, add crushed strawberries and sugar. 
  • Next you will gently fold your whipped cream into strawberry mixture.
  •  Pour mixture into individual serving glasses. Chill until mousse is set. Place a dollop of your favorite whipped topping on top, along with a fresh strawberry. Serve immediately, or cover with plastic wrap and chill until ready to serve. Enjoy!


Tuesday, March 31, 2015

When Life Gives You Lemons part two...

Well, we are still swimming in lemons! I am certainly not complaining, in fact, I am elated. However, it forces me to continue to look for additional fabulous uses for our giant, tangy, slightly sweet lemons. I have always been a big fan of lemon curd. I developed a passion for it during all of my years at Williams-Sonoma, they carried a brand that was truly out of this world. I realized that our lemon bounty was the perfect opportunity to take the time and attempt to recreate that one of a kind taste. For those of you who are not familiar with curd here is a brief explanation and history of something that sounds so odd, yet, is so incredibly tasty; Fruit curd is a creamy dessert spread and topping that is in general made with citrus. In order to make a proper fruit curd you will use egg yolks, sugar, juice zest and butter. In late 19th and early 20th century England, home-made lemon curd was traditionally served with bread or scones during afternoon teas and was frequently used as a filling for cakes, pastries and the ever popular tart. The traditional homemade curd did not keep well and therefore, was usually made in small batches. With the advent of modern refrigeration curd production was able to grow and commercial manufacturers were able to manufacture and offer a variety of curds in a variety of outlets. The beauty, however, of making your own curd is that you are able to omit the additional preservatives and thickening agents.
So, now you are thinking "I know what curd is, but, what in the heck do I put it on?". Here are a few of my favorite vehicles for my beloved lemon curd; Scones, toast, pancakes, waffles, crumpets, quick breads and muffins. I use it for cake and tart fillings regularly. The recipe is simple and delicious and I really think you will love it.

Lemon Curd


Ingredients:
  • 5 egg yolks
  • 1 cup sugar
  • 1/3 cup lemon juice, this is about 4 lemons
  • The zest of your 4 lemons
  • 1 stick unsalted butter, chilled and cubed

Instructions:

  • Add enough water to a medium saucepan to come about 1-inch up the side. Bring to a simmer using medium-high heat.
  •  While the water is heating, combine egg yolks and sugar in a medium size metal bowl and whisk until smooth and sot grainy.
  •   Add juice and zest to egg mixture and whisk smooth. 
  • When you water is simmering, reduce the heat to low and place bowl on top of saucepan. (Bowl should be large enough to fit on top of saucepan without touching the water, you are making your own double boiler) Whisk until thickened, approximately 8 to 10 minutes, the mixture should be light yellow in color and coat the back of a spoon.
  •  Remove promptly from heat and stir in butter cubes a piece at a time, allowing each addition to  melt completely before adding each additional cube.
  •  Place in a clean container or jar and cover by laying a layer of plastic wrap directly on the surface of the curd. This will help to ensure the curd doesn't develop a film on the top. Refrigerate for up to 2 weeks and enjoy on everything!


Friday, February 27, 2015

When Life Gives You Lemons...


Well, life has definitely changed over the last year and I'm certain its for the best, although, it may not have seemed so at the time. Part of my new adventure includes a cowboy and in this case a cowboy with a lemon tree. My cowboy is kind, handsome and can cook. Impressed right?! Well in addition to that he has fruit trees and here in Arizona it is definitely lemon season ( truth be told, around here it's pretty much always lemon season) and my Lord this tree is full! Working that much citrus into your diet may seem like a challenge, but the good news is, everything tastes better with a little lemon. Who doesn't love a big glass of lemonade after a hard days work shoveling horse poop, wrangling dogs and horses and folding that ever-growing laundry monstrosity that lives in my closet? And, did you know the purported health benefits of lemons? They seem to be endless; Lemons are (deep breath) great for restoring the body's pH balance, rich in vitamin C, perfect detoxifiers, they help to neutralize free radicals and strengthen blood vessels which can help lower blood pressure, they treat scurvy (important if you are considering becoming a pirate) and most importantly they kill intestinal worms (wow, yuck).  How awesome is it that I have now included intestinal worms in a food blog. I probably should delete that but, I wont, because it's just plain cool and goes to show the power of the mighty lemon. Recently, I have started a hot lemon and honey water ritual in the morning. The local honey helps with allergies and the lemon takes care of all of the previously mentioned "things".  Finally, I want to share one of my favorite recipes using lemon. I have to tell you I found it in the Better Homes and Gardens cookbook years ago and have altered it over time. It is always a favorite. Its fresh, filling, easy and tasty. I also included my super simple, super delicious recipe for lemonade. Now to tackle the laundry in my closet. Sigh.
Told ya! That's a lot of lemons on the cowboy's tree.
 
 
Lemon and Kalamata Olive Chicken
 
Ingredients:
  • 1.5 lbs. boneless, skinless chicken breast
  • 2 tbs. olive oil
  • 1 1/3 cup dry orzo
  • 1 cup drained and pitted kalamata olives
  • 2 14 oz. cans of chicken broth
  • 1 lemon, cut into wedges
  • 2 tbs. lemon juice
  • 2 tsp. Greek seasoning
  • 1/2 tsp salt
  • 1/2 tsp pepper
Directions:
  • Season your chicken breasts with 1 tsp of the Greek seasoning and a sprinkle of some salt and pepper. In a Dutch oven or braiser, brown the chicken in the hot olive oil over medium high heat for about 5-8 minutes or until the chicken easily releases on each side, turning only once.  Stir in the orzo, olives, broth, lemon wedges, lemon juice, remaining Greek seasoning, salt and pepper.
  • Bake, covered in a preheated 400 degree oven for about 45 minutes or until the chicken is tender and no longer pink. Serve and enjoy.
    This is a handy little gadget that you can get at your local kitchen store. It's an olive pitter. If you can't find pitted olives, give this a try. I use mine all of the time for stuffing my favorite olives and pitting cherries. You can find it at www.williams-sonoma.com


Homemade Lemonade


Ingredients:
  • 2 cups sugar
  • 1 cup water
  • 2 cups fresh lemon juice
  • 1 gallon ice water
 
Directions:
  • Make a simple syrup with your sugar and water. To do this add your 1 cup of water to a sauce pan and then add your sugar.   Cook over medium heat, stirring constantly until the sugar is dissolved completely.
  • Place your 2 cups of fresh lemon juice in a large pitcher and add the 1 gallon of ice water. Slowly add your simple syrup to the pitcher and mix well. Tada! Homemade Lemonade!


Friday, November 21, 2014

Sounds a Bit Fishy to Me...

Well, it sure has been a while since I have posted and boy have I missed it. It's funny how life happens and sometimes the things you love most need to be pushed aside for the things that need to be done. Over the last few months I have embraced the things from my past and the people and things that have influenced me the most and made me who I am. One memory that I cherish most is of my time spent in Oregon with my Grandparents and extended family. I spent many summers in Oregon and some of that time was spent salmon fishing. My grandmothers recipe for salmon was simple; tin foil, margarine and old bay seasoning and it was delicious. My recipe for salmon is a bit different and is derived from one by Giada De Lauretiis. It is healthy, tasty, simple and satisfying. I hope you enjoy it as much as I do.

Baked Salmon in Foil Packets


Ingredients:
  • 4 (5-6 oz) Salmon Fillets
  • 2 teaspoons Extra Virgin Olive Oil
  • Salt and freshly ground black pepper
  • 4 Roma tomatoes, diced
  • 4 green onions, diced
  • 3 tablespoons fresh lemon juice
  • 1 teaspoon red pepper flakes

  •  
     
     
    Directions:
    • Preheat the oven to 400 degrees F.
    • In a mixing bowl mix the olive oil, salt, pepper, tomatoes, onions, lemon juice, and red pepper flakes .
    • Place a salmon fillet, on a sheet of foil large enough to wrap around the salmon and top with the tomato mixture from the bowl. You may want to pull the sides of the foil up in order to prevent the mixture from running onto your counter.
    • Twist the ends of the foil to form a spiral shape so that the salmon and toppings are sealed nicely within.
    •  Repeat this process until all of the salmon have been individually wrapped in foil and placed on the baking sheet.
    •  Place the packets  large baking sheet.
    • Bake until the salmon is just cooked through, about 25 minutes.
    • Remove the packets from the baking sheet using tongs or a spatula, unwrap and serve.

    Wednesday, January 8, 2014

    Which came first, the Armadillo or the Egg?

    I like Duck Dynasty. I like the family and the life they seem to lead in Monroe, LA. I love their American story. To me, making something out of nothing is the American dream, the success of  Duck Commander is what so many of us in this great country strive for. To create something that we are passionate about and become successful doing and making what we love. I think it's phenomenal and I think we all have the potential to do the same thing and that there is one of the many reasons I am oh so proud to live in our amazing nation. God bless the U.S.A. Just so you know in the back of my head I am hearing the chant "USA, USA, USA!", that's right I am fully capable of creating my own imaginary audience and I love that about me!
    Anyway, when I found that Duck Commander had released a cooking video a few years ago, of course I had to buy it. I am really glad I did. The recipes are simple and really quite tasty. One recipe that caught my attention was the Armadillo Eggs. Everything savory dish I make ends up on the spicy side and when I saw the jalapeno wrapped in sausage, wrapped in bacon I knew immediately this recipe was for me. This is a fantastic appetizer, lunch, side dish or tailgate treat. This time I stuck to the Duck Commander recipe, but next time I will use Andouille sausage because, honestly, that just sounds super rad!


    Duck Commander's Armadillo Eggs


    Ingredients:
    6 to 8 large jalapeno peppers, cut in half lengthwise and seeded
    8 ounces cream cheese, softened
    2 pounds breakfast sausage
    1 pound bacon, the thinner the better
    1 stick butter, melted


    Fill your cored jalapenos halves with cream cheese.
     
     
    Wrap the filled jalapenos with the bacon
     
    Directions:
    • Fill each jalapeno half with cream cheese.
    • Take a small handful of your breakfast sausage and form into a small, flat patty.
    • Mold sausage around each jalapeno half, making sure to cover the entire pepper.
    •  Wrap each sausage wrapped pepper with a slice of the thin bacon.
    • Cook the eggs on an open grill until the sausage is cooked through and the bacon is crispy.
    •  If you don't have an outdoor grill, bake in the oven for 15 to 20 minutes in a 400 degree oven and then broil until the bacon is crispy.
    • Once the bacon is crispy, remove the armadillo eggs from the grill or oven and cover with melted butter.
    • Enjoy!
     
    Here we go!


    Yum!


    Friday, January 3, 2014

    Rediscovering Lost Treasures...

    This year for Christmas I received an unexpected treasure, a very special old cookbook. If you follow my blog then you know that I covet old cookbooks and am a hoarder of sorts (check out my What's Old is New Again... entry). I couldn't wait to open it up and peruse the recipes of yesteryear. When I opened the cover to my delight I found that the previous owner had taken the time to clip recipes out of her local paper and glue them into the book. The book was originally published in 1931 and most of the news paper clippings are from the 1940's and early 1950's. I think that she probably lived in either Kansas or Nebraska (or both) because that seems to be where the clippings are from. Of course this makes me love her even more as my Mom's family is from Nebraska and that state has always held a special place in my heart. My lovely Midwestern matriarch, this is of course all in my head, but, nonetheless how I think of her, took the time to add helpful hints in her own hand that I will take with me. Her handwriting reminds me of my grandmother's and I love it. This book was clearly important to someone, someone who like me had a love of cooking. It is really amazing how this same book has connected the two of us through it's recipes. I will never know who she was, but, I like to imagine that she is looking down smiling as I cook the recipes that she so lovingly added to the pages of this wonderful treasure. This deliciously sweet, fresh and juicy dessert is one of those recipes that she added, it caught my eye almost immediately and boy am I glad it did. I tweaked it a tiny bit, but, not too much. This recipe is fantastic and easy, I will be making it again and again and hope you will do the same!

     
    The Household Searchlight Recipe Book
    The Household Magazine
    Topeka, Kansas 1935
     
     
    The original clipped recipe, carefully glued in place by our matriarch.


    Banana Pineapple Whip
     
     
    Ingredients:
    1/2 cup mashed bananas
    1/4 cup sugar
    1/8 tsp salt
    1 tbs lemon juice
    1 20 oz. can  pineapple chunks, drained
    1/2 cup whipping cream
    1 cup of shredded, sweetened coconut
    2-3 additional sliced bananas, for garnish


    Directions:
    • Combine bananas, lemon juice, sugar and salt.
    • Cook over low heat, stirring constantly until mixture begins to boil.
    • Remove from heat and place in refrigerator until chilled.
    • Once the mixture is nicely chilled remove from fridge and add your pineapple chunks.
    • Make your whipped cream in the bowl of an electric stand mixer or with a hand mixer, whip the cream until it forms soft peaks.
    • Fold the fresh whipped cream into the banana and pineapple mixture. Garnish with additional sliced bananas and coconut and serve in your favorite dish! Enjoy!
    • Serves about 4
     

    Wednesday, December 11, 2013

    My Eggcelent Christmas Adventure...


    Christmas is here and along with the presents and lights and all around good cheer comes what could very well be the best part of all, traditions.  Each family has traditions of their own, in our family we always went to my Grandparents house on Christmas eve, ate honey baked ham (which was the only time I have ever eaten ham by choice, not really a fan, weird I know), bean salad and relished in the fact that my sister and I were the only grandchildren.  Christmas eve seemed to be all about us and I'm not going to lie, it was awesome. The drive home was filled with possible sightings of Rudolph and Santa's sled and promises of staying in bed until at least 7 am. Christmas day at home was filled with the usual gifts and family time and was always finished off with my mom's amazing prime rib and twice baked potatoes.  It really was perfect and was what I always thought was the way I would spend every Christmas,  but, I was wrong. In 2006 I met Ayman and in September of that same year we were engaged. The following Christmas we decided would be spent in Egypt.  I knew that an Egyptian Christmas would be different from our good old fashioned American Christmas, but, little did I know how different.  Ayman's family is wonderful and celebrates Christmas like many Coptic families. First and foremost Christmas is celebrated on January 7th, for the 45 days prior they do not eat meat or dairy,  there are no gifts exchanged, Christmas trees or lights, but, there is an overwhelming feeling of love, humility and faith. At midnight on the night of the 6th the "fast" is broken and the feast begins. We ate and laughed and truly celebrated.  It was different from any Christmas I had ever known and it was wonderful.  One of the traditional foods we ate were hard boiled eggs fried in ghee.  They are absolutely fantastic. It is almost like a fried egg and a hard boiled egg had a super secret and delicious love child. I have since asked Ayman what they are called and he has told me he's not sure how it is spelled in English or what it is even called, but I will give it a shot...baid mezzahl. Once  a year we make Ayman's family's traditional Christmas meal and these eggs are always included. They are part of his tradition and are now a part of mine. I love them and hope you do too.
     
    Fried Hard Boiled Eggs


    Ingredients:
    1 dozen hard boiled eggs
    1/2 cup of Ghee
    2 Tbs. Salt
    2 Tbs. Pepper
    1 tsp. Cumin


    Directions:
    • In a medium sized skillet, heat your ghee until it is melted and hot, turn the heat on your stove down to medium.
    • Mix your salt, pepper and cumin together in a small bowl and sprinkle it on your hard boiled eggs.
    • Carefully place your eggs in the hot ghee and allow them to brown on all sides. Allow them to sit on one side for about 2-3 minutes before rolling them.  They should be a dark, golden, reddish brown when they are done.  If the temperature gets too hot the eggs with pop and you can get burned so be careful. If this starts to happen, turn the heat down to medium low. 
    • Serve with pita or alone and enjoy! Oh, and be sure to serve them with the ghee from the pan, and dip your pita or Arabic bread in it, mmm mmm good!
    Merry Christmas, however you celebrate!
     

    Friday, November 8, 2013

    Let them eat...shortbread?!


    Ayman loves sweets and baked goods and I love baking, so, if that's all it takes to be happy then we are clearly insanely happy and meant to be together. Right?! Whatever. So after night after night of hearing, "Do we have anything for dessert?" I decided to head into the kitchen and bake something. Now, I could have said "What would you like me to make you?" but I did not. As you should all know, it is usually all about me and although I am not a big sweet eater I do love me some shortbread. So I made "him" shortbread, I also had a ton of leftover limes from my previous days adventures in salsa so I decided to make them lime shortbread cookies and was I ever glad I did. These cookies were fantastic, buttery, flaky and totally satisfying. You could definitely drizzle them in dark chocolate for some added decadence. Mine, of course, became German Shepherd shortbread cookies because I have a sickness and am obsessed with my two dogs (who are by the way the greatest, cutest, smartest and sweetest dogs on the planet and no, I am not lying or exaggerating its the darn truth), but, yours can become whatever you want! Sur la Table has a great selection of cookie cutters and that's where I got mine. Be creative and have fun! I hope you enjoy this recipe as much as we did.


    Lime Shortbread Cookies
    By: Vanessa Madigan


    Ingredients:
    2 cups all purpose flour 
    1 cup cornstarch
    1 tsp. salt
    1 1/2 cups(3 sticks) unsalted butter at room temperature
    1 1/2 cups confectioners' sugar
     3 tbsp. grated lime zest


    Directions:
    • Sift the flour, cornstarch and salt in a medium bowl and set aside.
    •  In the bowl of a stand mixer fitted with the paddle attachment, cream the butter on medium speed until it is light in texture and smooth, about 2-3 minutes.
    •  Add your confectioners' sugar and the lime zest and cream until it is relatively smooth, scraping down the bowl as needed.
    • With your mixer on low, mix in the dry ingredients until they are blended. 
    • Place your dough on a lightly floured surface and roll out into a large disc continue to roll the dough until it reaches approximately 1/4" thickness.
    •  Cover with plastic wrap and place in the refrigerator for about 30 minutes
    •  Preheat the oven to 350
    • Remove your dough from the refrigerator and proceed to cut into your desired shapes.
    • Bake your cookies for about 20 minutes or until the edges are light golden brown.
    • Allow cookies to cool completely on a rack, they will harden as they do, and enjoy!

     
     Hey Mom, are they done yet?!