Search This Blog

Sunday, January 13, 2013

Whats Old Is New Again!

I know that I have made my love of old cookbooks, and all cookbooks for that matter, known.  I have made many trips in many cities to old, musty thrift stores and second hand book sellers in search of funky and fabulous old cookbooks.  I am thankful to have a family that totally supports me in my quest and always amazes and surprises me by feeding my habit and giving me new (old) cookbooks.  I really do have and awesome family, no joke.  Just a bit off topic, as a "get well soon" gift my dad just sent me a 1966 copy of Larousse Gastronomique and the first American edition to boot! So anyway, I truly share a love of cookbooks with others in my family, in particular my Aunt Melinda.  The woman has a killer collection of cookbooks, it really is an impressive collection and one that I aspire to.  On one trip to the bay area to see her she gave me the "Time-Life Foods of the World" series of books (she had two sets, now do you see?! It's genetic) they were printed in 1969 and are so ridiculously cool.  They are wire bound and the slightly yellowing pages are filled with recipes that you have not only never heard of but would also probably never, ever try.  The Scandinavian book is filled with recipes for pickled fish, not exactly my cup of tea, but cool none the less.  While flipping through The Cooking of India book one night (yes, I read cookbooks in bed like they are friggen mysteries) I stumbled upon a recipe for Nargesi Kofta (ground lamb meatballs filled with hard-cooked eggs) and thought to myself, this may be the grossest thing ever or the most awesome thing ever.  So, clearly, the next day I went out and purchased my groceries and made it and it was....AWESOME!  Over the last few years, I have adapted the recipe to be a little more user friendly and made it my own.  Today, I am really excited to share that recipe with you.  It may seem strange but it is completely wonderful and delicious!


Indian meatballs stuffed with egg
By: Vanessa Madigan


Ingredients:
For the meatballs:
1 lb finely ground beef or lamb
1 raw egg
6 hard boiled eggs
1/4 cup chick-pea flour
1 tsp salt
1 tsp ground cumin
3 cups vegetable oil, for frying

For the tomato sauce:
1/2 cup olive oil
3 large yellow onions, very finely chopped
1 Tbs ground ginger
3 cloves of garlic, finely chopped
1 cup plain, unflavored yogurt
1 Tbs. garam masala
1 tsp tumeric
1 tsp ground red pepper
1 tsp salt
1 28 oz can tomato puree
1 16 oz can diced tomatoes
1/4 cup finely chopped cilantro (coriander)

Directions:
  • Mix your ground beef, raw egg, chick-pea flour, 1 tsp salt and 1 tsp cumin in a bowl.  You will want to mix it well to ensure the ingredients are thoroughly mixed.
  • Next you will divide your ground meat into 6 equally sized meatballs, once you have all 6 take the palm of your hand and flatten each one into a disc.
  • Place a hard boiled egg in the center of each disc and using your hands fold the meat around the egg so that it is completely encased in the meat.  You should now have somewhat egg shaped meatballs.
  • Pour the 3 cups of vegetable oil into a large skillet heat it to about 375 degrees. Deep fry your meatballs until they are a beautiful rich brown in color, this will be about 3 to 4 minutes on each side.  When each meatball is done, remove it from the oil and set it on a paper towel to drain.
  • Next you will make your tomato sauce.  In a large saute pan or deep skillet heat the 1/2 cup olive oil, add your very finely chopped onions and cook them until they are translucent.  Add the tomato puree to the olive oil and then the diced tomatoes. Stir the mixture well.
  • Add the ginger, garlic and yogurt to the tomato and onion sauce continually stirring to combine well. Finally, add the garam masala, tumeric, red pepper and the salt.  Simmer your mixture, stirring often for about 10 minutes.
  • Now, you will return your meatballs to the tomato sauce.  Sprinkle with the cilantro cover and cook over medium heat for and additional 5 to 10 minutes to ensure the meatballs are heated through.
  • Serve your meatballs covered in sauce and enjoy!  They go really great with fresh warm naan bread, just sayin!


Some of my old cookbooks!  This set is really wonderful, fun and inspiring.  Seriously, don't be afraid of funky old cookbooks, you might just learn something new!!

Saturday, January 5, 2013

Cocktails Anyone?

Cocktail time is....AWESOME!  I am not a huge drinker anymore, I feel like I got most of that out of my system during my years in Vegas plus, I am far to old to deal with hangovers,  I mean really, who has time for that!?  Having said that, I absolutely love the art of sitting with friends and family sharing a cocktail and chatting about life.  There is definitely an art to cocktailing properly and fortunately for me, my family has mastered it.  I do, however, have a tendency to get stuck in the cocktail rut, Jack and diet, Heineken or beer and that is really unfortunate.  There are amazing drinks out there and we need to make an effort to give each one their fair shot, well maybe not each one, but, we definitely need to try new things!  Here is something new you can try! I added vanilla bean to a more traditional recipe it almost gives it that lemon meringue pie taste.  This recipe is super easy, super good and absolutely approved for your next cocktail party!
 
Vanilla Bean Limoncello
By: Vanessa Madigan


Ingredients:
15 lemons, washed
2 750 milliliter bottles of Everclear, or a high proof vodka
4 cups sugar
10 cups water
2 vanilla beans, split

Directions:
  • Peel your lemons, being careful not to remove the bitter, white pith.
  • Place the lemon peels into a large 1 gallon bottle or jar and add 1 bottle of the everclear.  You will want to keep this in a cool, dark and dry place for about a month (30+ days).
  • Once your 30 days is up, add the second bottle of everclear to the mixture.
  • In a large sauce pan boil the sugar and 8 cups of the water, add your split vanilla beans to the water and sugar.  Once the pan is at a rolling boil, reduce the heat to medium low and continue to stir constantly to dissolve the sugar allow the pot to simmer until all of the sugar is completely dissolved. Remove the pot from the heat and allow to cool to room temperature.
  • Once the simple syrup is at room temperature add it to the alcohol mixture, definitely include the vanilla bean, and store it in a cool, dark and dry place for another 30+ days.
  • After 30 days have passed remove your alcohol from its hiding spot and add the remaining 2 cups of water. Next, strain it through a fine mesh strainer, cheesecloth or a coffee filter your alcohol mixture (to remove the lemon peel and vanilla bean) into your desired bottles for gifting or storing.  Your limoncello should keep for a couple of years in a cool place.  You can also store it in the freezer until you are ready to imbibe!

Wednesday, January 2, 2013

Arizona Dreaming...

My sister and I are California girls, born and raised.  When it came time for us to head off to college and venture out on our own,  Andrea decided to stay in California (honestly, who could blame her).  I, on the other hand decided to move here and there.  First stop Nevada, a state that I really, truly disliked for the first 4 years I lived there, but that eventually made its way into my heart and has become such a huge part of my life.  Next, it was Northern California, a brief but important journey in my life. In Northern California, I made new friends, grew into a responsible adult and found that no matter what, I could always depend on me.  After No Cal it was off to Arizona, a state that I have called home for the last 6 years.  I love it here, honestly, it is the only other place that I have truly felt at home besides San Diego.  I love the food, the wild west politics, the friends that I have made, the incredible natural beauty and the diversity of the people.  I could be happy here forever.  Okay, so here it is, wait for it... we have decided that we are moving back to Northern California and as excited as I am for new adventures, I will miss Arizona terribly.  I was thinking about dinner tonight and wanted to make something that tasted like Arizona. Whatever it was had to have fresh chilies, sun ripened tomatoes and just a little kick in the pants.  So this is it, this is what I came up with. It was super tasty, healthy and reminded me of my favorite state, Arizona. (Good thing we are keeping our house, because I plan on being back here as often as possible!)  I love you AZ! 

Pasilla Chilies Stuffed with Turkey
Written, developed and tested by: Vanessa Madigan


 Ingredients:
6 Pasilla Chilies
6 Tomatoes
1 Lime (juiced)
1.5 lbs ground turkey
salt
Tabasco
1 cup mushrooms, chopped
1 jalapeno, chopped
2 cups sharp cheddar cheese
1 small yellow onion, chopped
2 cloves of garlic, finely chopped
2 tbs. olive oil

Directions:
  • Preheat oven to 450 degrees
  • To a preheated medium sized skillet add your olive oil and turkey, brown your turkey in the olive oil.
  • Once turkey is cooked add your onion, mushroom, jalapeno and garlic. Cook until the onions are translucent and the mushrooms have lost most of their liquid, stirring frequently.
  • Season the mixture with salt and Tabasco, stir to mix thoroughly.  Remove from heat.
  • Add 1/2 cup of the cheese to the meat mixture. Set aside while you prepare your chilies.
  • Wash your pasilla chilies and prepare as follows; using a very sharp knife and starting at the tip (bottom) cut your chilies lengthwise up the center to the stem. Using your thumb pop the top of the chili off and discard.  This should take the seeds with it, if not, gently scoop out any remaining seeds and throw them away.
  • In a small bowl mix your chopped tomatoes, 2 tsp salt and the lime juice, set this aside, it will be your topping when the chilies are done.
  • Once your meat mixture is cool enough to work with, take a large spoon (soup spoon size) and fill your chilies. Place your filled chilies in a large baking dish.
  • Place the stuffed chilies in the oven and bake for 5-10 minutes. Once the skin begins to blister, remove the chilies from the oven and top with the remaining 1 1/2 cups of cheese.  Place the pan back in the oven for about 5 minutes and allow the cheese to melt.  Once the cheese is melted, remove from the oven.
  • Top the chilies with the fresh tomato, lime and salt "salsa" and serve.

Wednesday, December 19, 2012

Asparagus For Allofus!

 
So, I'm going to continue with the appetizer/side dish theme from the last post. We can always use more side dish options or at least I can.  I think that we can all agree, bacon is a crowd pleaser and not only that just about everything is made better with the addition of bacon. Seriously, a person very dear to my heart once told me that he was always able to keep kosher until the day he had a bacon cheeseburger, from that day on he was a non-kosher Jew. He was a bacon lover from that moment on.  I love that story. This is a super simple recipe that you can whip up easily before company comes over or just to satisfy a hungry family.  The addition of the slightly spicy, tangy vinaigrette cuts the salty (and delicious!) fattiness of the bacon. Seriously, its amazing! I am totally in love with my newest creation xoxo.
 

Bacon Asparagus Bundles with Serrano Chili Vinaigrette
Written, developed and tested by: Vanessa Madigan


Ingredients:
1 16oz. package thin sliced bacon
1 bundle of asparagus, relatively thin
olive oil for drizzling
2 Tbs Paprika
2 Tbs Black Pepper

For the vinaigrette:
1/4 cup rice vinegar
1/4 cup olive oil
1 Tbs Dijon mustard
1Tbs sugar
2 Serrano chilies, chopped
salt and pepper to taste

Directions:
  • Preheat your oven to 400 degrees
  • Trim the asparagus, it will end up about 4 or 5 inches.  This is important to get rid of the woody base, yuck.
  • Drizzle the asparagus with your olive oil.
  • Take about 4 pieces of your trimmed asparagus and starting at the bottom wrap your bundle tightly all the way up until just the leafy tops are peeking out. Place each one on a cooking sheet with the lose end down so that it wont curl up when cooking.
  • Dust your bacon wrapped asparagus with the paprika and black pepper.
  • Place your baking sheet in the oven and let the bacon and asparagus cook for about 12 to 15 minutes.  The bacon will brown, cook and shrink up.
  • While your bacon and asparagus are cooking you can make your vinaigrette 
  • In the bowl of a food processor or in a blender, add all of your ingredients; the chilies, olive oil, vinegar, sugar, mustard, salt and pepper. Blend until the mixture becomes emulsified and does not separate.
  • When your bundles are cooked remove from oven and they are ready to serve! Drizzle them with the Serrano vinaigrette and enjoy!

Sunday, December 16, 2012

All Kidding..A Side!

 
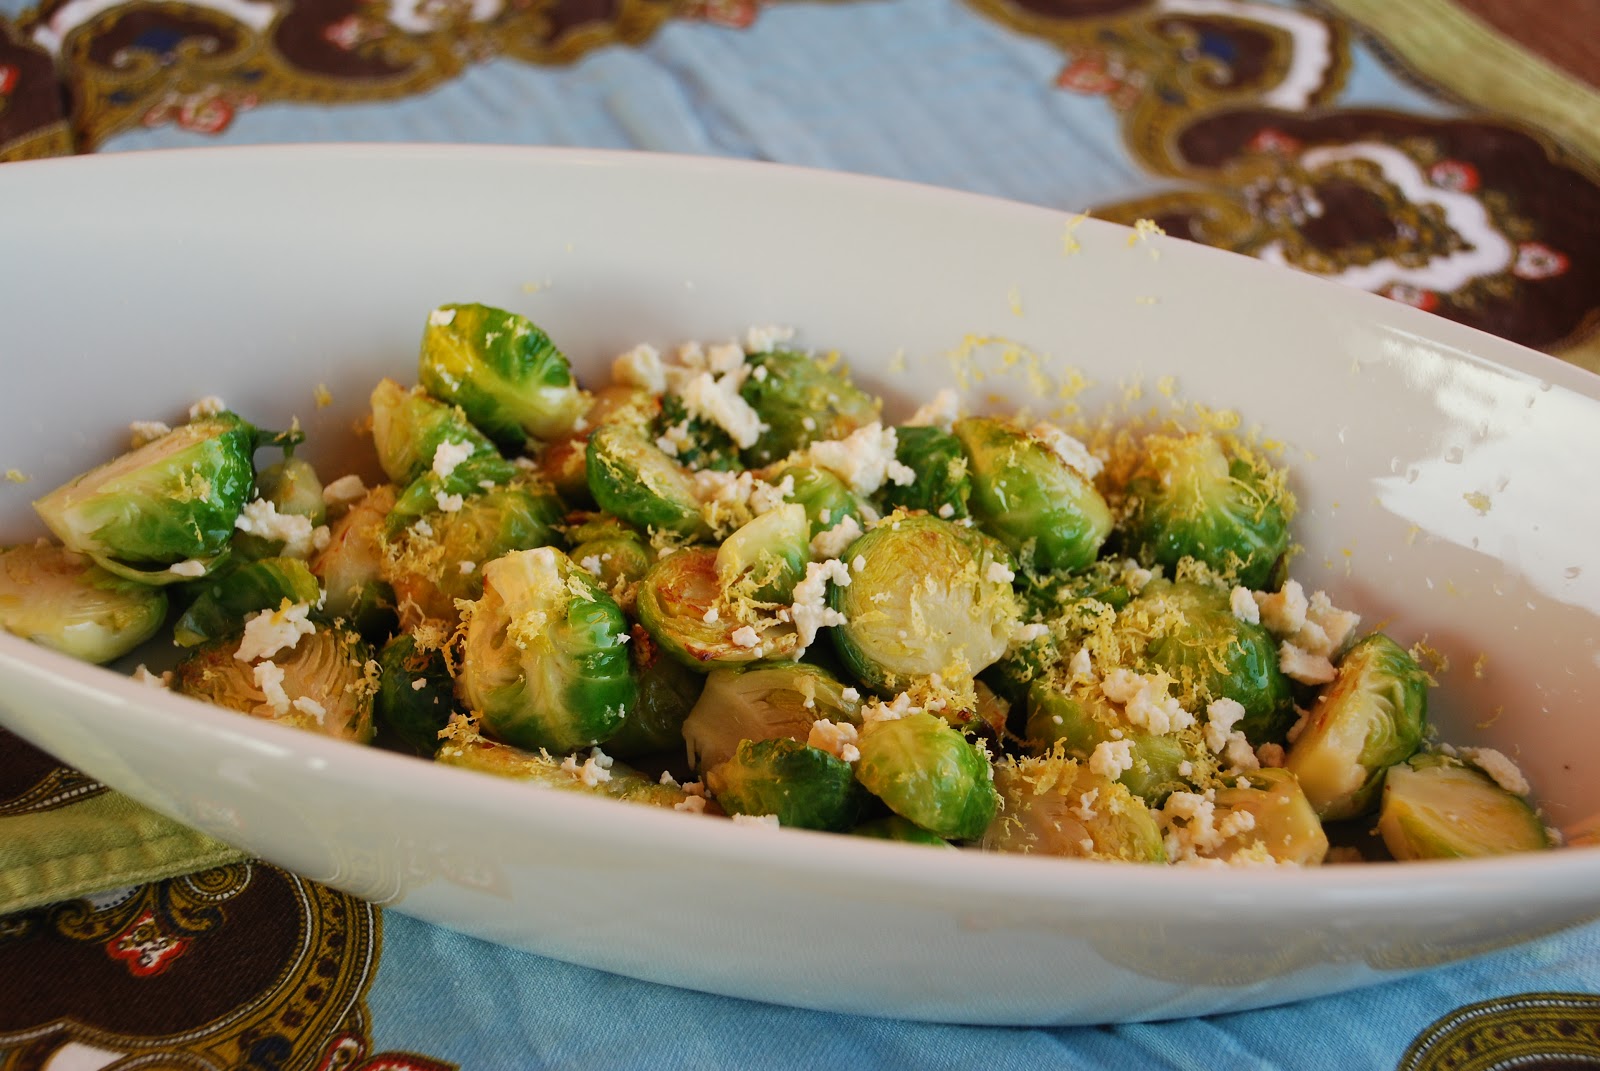
Side dishes finish a meal and occasionally they can be the star!  Lately, Ayman and I have been eating a ton of vegetables, we are really trying to be as healthy as we can be.  We go on walks, which is much appreciated by our two perfectly wonderful but very athletic German Shepherds, we eat a mostly vegetarian diet and are drinking a stupid amount of water. Do I feel better? I guess. Do I miss the hell out of Filibertos carne asada burritos and Diet Coke? Oh my God, you have no friggen idea!  In order to keep meal time interesting and avoid getting stuck in the spinach salad rut, I bring home tons of vegetables from the store that I have no idea what to do with and then we, well, we just figure something out with what we have so that they don't rott away in the fridge.  I don't cook with Brussels sprouts on a regular basis, in fact, I think I have only made the once or twice in my 40 years.  Don't get me wrong, I like them, its not love for certain, but I do like them, I just don't ever make them.  Two pounds of these tiny cabbages made their way home with me the other day and I pushed them aside repeatedly until I realized that their time was coming to an end and I needed to use them now.  I put together the following recipe with 5 simple ingredients that we all have laying around.  It turned out fantastic and I will most certainly make it again!


Lemon Feta Brussels Sprouts
Written, developed and tested by: Vanessa Madigan


Ingredients:
2lb Brussels Sprouts
6 tbsp olive oil
4 cloves garlic, crushed
1 lemon, juice and zest
1/2 cup Feta cheese, crumbled
salt and pepper
 
Directions:
  • Clean your brussels sprouts and cut each one in half.
  • Heat your olive oil in a large skillet over medium high heat.
  • Once your pan is hot, add the brussel sprouts to the pan and saute for about 15-20 minutes  until the outer part is a caramelized and has begun to brown. The brussels sprouts should be tender and a bit wilted
  • Once the brussels sprouts are cooked add the garlic and saute until translucent.
  • Next add the lemon juice, salt and pepper.
  • Top with the crumbled feta and lemon zest and serve!

Sunday, November 25, 2012

It don't mean a thing if it ain't got a wing

In this economy we are all looking for easy, cost effective, healthy and delicious meals that we can serve with pride.  This is one of those recipes.  "A chicken in every pot" was used by the Republican party in 1928 to tout Republican prosperity, I say hear hear! Buying a whole roaster is an inexpensive alternative to buying your same old, same old flavorless boneless skinless chicken breasts (yawn!), it goes a long way and can feed an entire family.  In addition you can make amazing chicken stock with the left over bones, talk about stretching you dollar!  This is an easy way to spice up your roast chicken this fall.  So skip the deep fried wings this Sunday and sit down with the family or some friends and enjoy a real Sunday supper with your favorite familiar football flavors.


Buffalo Roast Chicken
By: Vanessa Madigan


Ingredients:
5 to 6 lb Roasting Chicken
16 oz. Franks Red Hot hot sauce
1 stick butter
1 large yellow onion, sliced thickly
1 head of garlic , cut in 1/2 crosswise
2 tbs. ginger
1 lemon, cut in half
salt
pepper


Directions:
  • Preheat oven to 425 degrees.
  • Remove giblets and clean any residual pin feathers rinse and pat dry.
  • Season your chicken liberally with salt and pepper, inside the cavity and all over the skin.
  • Stuff the cavity of your chicken with the onion, garlic, ginger and lemon.
  • Melt 1 stick of butter and add to that the Franks Red Hot sauce, stirring constantly to blend the two. Once it is blended well pour 1/2 of the sauce into a small bowl, this will be what you will baste the chicken with.  The remaining sauce in the pan will be your dipping sauce for your chicken.
  • Baste your chicken well with your butter and hot sauce mixture and place it in your preheated oven.  Continue to baste your chicken with the remaining sauce 4-5 times throughout its cook time.
  • Roast the chicken for about 1 1/2 hours or until the juices run clear.
  • Serve with the remaining hot sauce and blue cheese sauce. So zippy, tangy and yummy!


Blue Cheese Sauce
By: Vanessa Madigan


Ingredients:
1 clove garlic, chopped very finely
6 oz. blue cheese
2 cups sour cream
2 tbs. butter


Directions:
  • Saute the garlic in the butter until the garlic is translucent.
  • Add the blue cheese and sour cream, stir constantly over medium low heat until blended well.
  • Serve as a dipping sauce or as a drizzle for your delicious Buffalo style roast chicken!

Saturday, November 24, 2012

Amazing Grazing

I'm a grazer, it's just who I am.  Maybe, my love of appetizers stems from the time I spent in bars for the many years I lived in Vegas or memories of my grandfathers jalapeno dip, chips and salsa on our frequent dinners in old town, my favorite clam dip on Christmas day, or my Mom's hummus on hot summer San Diego afternoons while we listened to the soundtrack from Laurence of Arabia.   I adore finger foods and I adore the whole ritual of sitting around with those you love, sharing the same food, enjoying small plates with so many big and different flavors talking, laughing and relaxing.  That is what grazing is to me and I will find any excuse to make small bites and share them with others.  The other day, I was in just such a mood.  I already had the fixins' for an amazing salsa and some great local tortilla chips, but, I needed something else.  I headed to the fridge to see what I could whip together and I found all of the ingredients I needed for a new twist on an old favorite jalapeno poppers.  They came out great, which is more than I can say for the photos.  This super easy recipe is great for movie night, parties or whenever! 


Jalapeno Popper Pockets
By: Vanessa Madigan


Ingredients:
8 oz. cream cheese at room temperature
16 oz. bacon, cooked until crisp and chopped
1/4 cup sharp cheddar, finely grated
3 green onion, chopped
3 jalapenos, seeded and chopped
3 tbs butter, melted
1 package phyllo dough, thawed


Directions:
  • Preheat oven to 350 degrees.
  • Combine bacon, jalapeno, cream cheese, green onion and cheddar cheese in  a small mixing bowl, stir until thoroughly mixed and ingredients are dispersed evenly throughout.
  • Take one sheet of phyllo and set it on your work surface and using a pastry brush coat with a layer of your melted butter.  Place another sheet directly on top of the first and again coat with the melted butter, repeat this one more time so that there are three layers of phyllo.
  • Repeat the abouve process to make one more three layer sheet.
  • Using a sharp knife, cut three equal sections vertically and one horizontally across the middle, to make 6 equal squares on each of your two phyllo sheets.
  • Spoon about two tablespoons of your cream cheese mixture into the center of each square.
  • To fold, bring each horizonatl end to the center and then each vertical end to the center. Flip over and place on a baking sheet.
  • Bake for 20-25 minutes or until golden brown.


Sunday, November 11, 2012

Middle Eastern Encore

Sticking with my theme of posting whatever I want while my sister is on hiatus, I am taking you all back to the Middle East.  During my travels in Egypt I tasted so many wonderful new flavors and foods.  This recipe is not one of them, see... you thought it was going to be a long drawn out story about eating this blah,blah, blah down some back street of Cairo, didn't you!? Actually, Kibbeh is something that I had for the first time at my favorite Middle Eastern grocery store right here in Phoenix.  For those of you who live in the Phoenix area my favorite destination for all of my Egyptian, Indian and Mediterranean pantry ingredients is Baiz Market Place near downtown.  They have a great selection of spices, peppers, canned goods, meat and bakery/pastry items.  In addition they also have a small restaurant that serves amazing treats including falafel, shawarma and....wait for it...kibbeh!  I have since enjoyed kibbeh many times and finally decided to deconstruct it and make my own.  It is delicious.  The flavor brings you to a place reminiscent of spice markets and street vendors and the texture is crispy on the outside and warm and satisfying on the inside.  You can serve it as an appetizer or as a main course, in our home we do both.   It is a little something different and I am certain you will enjoy it.

Kibbeh
By: Vanessa Madigan


Ingredients:
2 lbs finely ground beef
1/2 lb. #2 bulgar wheat
1 tsp black pepper
1 tsp salt
1/4 tsp cumin
1 tsp allspice, finely ground
1 tsp ground red pepper
1 small onion, chopped very finely
1/2 cup toasted pine nuts
3 tbs olive oil
vegetable oil, for frying


Directions:
  • Soak bulgar for about 30 minutes until soft.  Drain water, press remaining water out of wheat with your hand.
  • In the bowl of a stand mixer or food processor, combine the bulgar with half of the meat (for this recipe it will be 1lb.), season with a bit of salt. Turn on to low (mixer) or pulse (food processor) until combined very well and until it becomes almost dough like. If using a stand mixer use the paddle, if using a food processor use the dough blade. Set aside.
  • Heat your olive oil in a large skillet add the rest of your meat and the finely chopped onion. Make sure to watch your meat and work it to make sure it stays fine and doesn't get clumpy. Add your allspice, salt, cumin, red pepper, black pepper and pine nuts.  Once the ground beef is cooked thoroughly remove from heat and allow to cool.
  • To assemble the kibbeh, take a small handful of the "dough" mixture (about the size of an large egg) and press to form a small disc.  Place the disc in your hand and form a small cup. 
  • Next, take a scoop of the meat and pine nut mixture and put it in the "cup".  Pinch the top of the cup together and roll in your hands to form a small football.  Set aside and continue until all of the dough and all of the meat is used.
  • In a deep fryer or on the stove top, heat vegetable oil to 350 degrees. Fry until golden brown and crispy.  Serve alone or with tahini and enjoy!


Below, you can find my recipe for tahini which was included in our previous post-We Got No Beef With You! - Vegetarian Delights!


Homemade Tahini
By: Vanessa Madigan


Ingredients:
1 Cup Sesame Tahini
1 Tbsp. Flour
4 Tbsp. White Vinegar
3/4 Cup Water
1/4 tsp Cumin
1/4 tsp Salt
1/4 tsp Chili Powder

Directions:
  • Pour the Sesame Tahini into a bowl
  • Add the Flour to the Tahini and stir well.
  • Slowly add the White Vinegar.  The Tahini will begin to seize up and become more difficult to stir, but, continue stirring to incorporate the Vinegar into the Tahini.
  • Very slowly add the water to the Tahini mixture, stirring continuously until the mixture turns light and creamy. You may need to add additional water if you like your Tahini thinner.
  • Once your mixture is creamy add the Cumin, Salt and Chili Powder and mix well.
  • Add the Tahini to the Falafel, Grilled Meat, Seafood or even just use it for dipping bread and veggies!

Sunday, October 28, 2012

Some Like It Hot

"Hey hey hey!!!
But I like it when that lightning comes
Hey hey hey!!!
Yes I like it alot
Hey hey hey!!!
Yes I'm jumping like a jumping jack
Dancing screaming itching squealing fevered
Feeling hot hot hot!!!- The Cure


Yes, needless to say, I like it hot.  It seems as though everything we make has a spirited kick.  I have detailed how we, at any given time, have a minimum of 6 different hot sauces and several types of peppers in our pantry. I have always had a love of all things fiery.  When I was very young, my Grandfather would make Jalapeno dip ( a recipe which I will most certainly share with you all soon) and even as a wee tyke I would scoop it up and devour it with relish. Clearly, I was not your typical PB&J loving child.  When I was a bit older my Father introduced me to the joys of Tabasco sauce and even made a special out of the way excursion on one family vacation to my own personal Mecca, Avery Island, Louisiana.  Avery Island is of course the home of Tabasco and it it beyond wonderful.  As a side note, my little sister was also taken to the home of her gastronomic obsession on a subsequent family vacation, Hershey, PA.  That just about sums up the contrary nature of our pallets.
 Today, I am serving up two spicy little numbers that I am sure you will enjoy.  The first is a Southwestern inspired potato dish that will certainly add a kick to any meal and the second is a spicy Serrano chili cheese bread that would be amazing with a big bowl of chili or as a slice of toast with your eggs in the mornin'. 


Southwestern Spicy Habenero Smashed Potatoes
Written, developed and tested by: Vanessa Madigan


Ingredients:
1 Stick of butter
1 cup of sour cream
1 cup sharp cheddar cheese
3 habenero peppers, diced
12 oz. chorizo
10 large red potatoes
1 4 oz. can of diced green chilies
2 15 oz cans of corn
3 green onion, diced
1 green onion, diced for garnish
1 1/2 tsp salt
hot sauce for garnish.

Directions:
  • Half potatoes with a knife and place in large pot of water.  Boil potatoes until tender.  You should be able to piece the potatoes easily with a fork.
  • Using gloves wash your habeneros, once they are cleaned and topped, dice them. At this time you can also dice your green onions.
  • Take chorizo out of casing/packaging and cook in a medium size fry pan, drain off excess fat.  Once the chorizo is cooked thoroughly add the corn, green chilies, diced green onions and diced habeneros. Allow to cook on low while you finish your potatoes.
  • Once potatoes are cooked, drain the water from the pot.  Add the butter, sour cream and salt to your potatoes and using a potato masher, mash the potatoes until the butter and sour cream are worked in.  The potatoes should be lumpy and roughly smashed, not creamy and smooth. Preheat your oven to 400 degrees.
  • Stir your chorizo mixture into the potatoes.  Place your new potato mixture in a medium sized (about 3 quart) baking dish.
  • Top with the cheddar cheese and bake until cheese is melted and bubbly.
  • Before serving, top with remaining diced green onion and enjoy!


Serrano Chili and Cheese Bread
Written, developed and tested by: Vanessa Madigan


Ingredients:
3/4 cup warm water
1 tbsp honey
1 1/2 teaspoon instant yeast
2 large eggs
4 tbsp olive oil
2 1/2 cups flour, plus a bit more if needed
1 tsp salt
1 large egg lightly beaten

2/3 cup sharp cheddar cheese
12 serrano chilies, thinly sliced.
1 packet ranch dressing mix, dry


Directions:
  • Preheat your oven to 375 degrees after your dough has risen.
  • Combine the warm water, honey and yeast.  Whisk the three ingredients together until well blended. Let this mixture sit for about 10 minutes or until it gets foamy on top.
  • Add the 2 eggs and the olive oil and whisk again until well blended. 
  • Pour the yeast mixture into the bowl of a stand mixer add the salt and flour slowly to the bowl. Be sure to use the dough hook attachment. Put the mixer on low while adding the flour, turn up the mixer to medium (about 4 on a Kitchen Aid stand mixer) and allow the dough to knead for about 5 to 7 minutes.  You may need to add additional four at this point, add it very slowly, about a tablespoon at a time.  The dough should pull away from the sides of the bowl and be tacky, but not sticky.
  • Place the dough in a lightly oiled bowl and cover with a lint free cloth.  Allow the dough to rise for 50 to 60 minutes.  It should double in size.
  • Turn out your risen dough onto a lightly floured surface. Using a rolling pin, gently roll out the dough into a rectangle about 16x18 inches. 
  • Evenly sprinkle your bread with the ranch dressing packet. Next add the sharp cheddar cheese and the Serrano chilies.  Make sure the chilies are dispersed evenly.
  • Beginning with the wide edge roll the bread into a log.  This should ensure there will be layers of cheese and chilies in every slice. 
  • Place the roll, seam down on a silpat and tuck edges under.
  • Cover your bread with a lint free cloth and allow to rise for an additional 50 minutes or until about doubled in size.
  • Using a very sharp knife make several shallow slits across the top of the bread.
  • Brush the slightly beaten egg over the top of the bread, make sure it doesn't get clumpy or pool or drip off the bread.  You will not need to use all of the egg wash.
  • Place your bread in the oven at 375 degrees and bake for about 20 to 25 minutes or until the top is golden brown. 

Saturday, September 15, 2012

Let me hear ya Challa!

I am a stress baker and lately I have been, well, stressed.  This little known fact about me in addition to my previously professed love of all things Jewish, forced me to make this entry on my own.  Freshly baked bread is quite possibly the greatest smell on the planet and this recipe for challa is no exception.  Baking your own bread may take time but overall it is easy and the payoff is more than worth the investment. I was inspired to make challa because of the upcoming holiday of Rosh Hashana. Rosh Hashana  is commonly referred to as the Jewish New Year and will be celebrated this year beginning Sunday, September 16th.  Challa is made and served for many Jewish holidays and festivals, however, it is very common year round and is also made to be eaten on the Sabbath.  Traditional loaves are braided with six strands.  My challa is braided with three strands because my braiding skills leave loads to be desired.  Challa is an egg bread that is not only delicious the day it is served, it also makes amazing french toast and bread pudding.  I hope you enjoy this recipe as much as I do, and that the love and care you take making it relieves your stress as much as it does mine.

Challa
By: Vanessa Madigan


from the top..
Ingredients:
3/4 cup warm water
2 1/2 tbsp honey
1 1/4 teaspoon instant yeast
2 large eggs
3 tbsp olive oil
2 1/2 cups flour
3/4 tsp salt
1 large egg lightly beaten

Directions:
  • Preheat your oven to 375 degrees after your dough has risen.
  • Combine the warm water, honey and yeast.  Whisk the three ingredients together until well blended. Let this mixture sit for about 10 minutes or until it gets foamy on top.
  • Add the 2 eggs and the olive oil and whisk again until well blended. 
  • Pour the yeast mixture into the bowl of a stand mixer add the salt and flour slowly to the bowl. Be sure to use the dough hook attachment. Put the mixer on low while adding the flour, turn up the mixer to medium (about 4 on a Kitchen Aid stand mixer) and allow the dough to knead for about 5 to 7 minutes.  You may need to add additional four at this point, add it very slowly, about a tablespoon at a time.  The dough should pull away from the sides of the bowl and be tacky, but not sticky.
  • Place the dough in a lightly oiled bowl and cover with a lint free cloth.  Allow the dough to rise for 50 to 60 minutes.  It should double in size.
  • Turn out your dough on a lightly floured surface and cut into 3 equal sections. Using your hands gently roll out the 3 sections into about 16 inch lengths. Place the 3 sections on to a parchment or silicone lined baking sheet.
  • Pinch together the 3 ends and fold them under. Now, it is time to braid your bread.  Once the bread is braided, pinch together the end closest to you and fold it under as well. Allow to rise one more time for about 50 minutes, or until doubled in size.
  • Brush the slightly beaten egg over the top of the bread, make sure it doesn't get clumpy or pool or drip off the bread.  You will not need to use all of the egg wash.
  • Place the braided bread in the oven at 375 degrees and bake for about 20 to 25 minutes or until the top is golden brown.  Allow to cool and enjoy!